 Click for
a better view (48kb .)
Click for
a better view (48kb .) This document is intended to assist the novice chain mailer in designing and producing his own suit of armor.
These are sections:
You will need two pair of pliers, one lap tray. and a supply of rings.
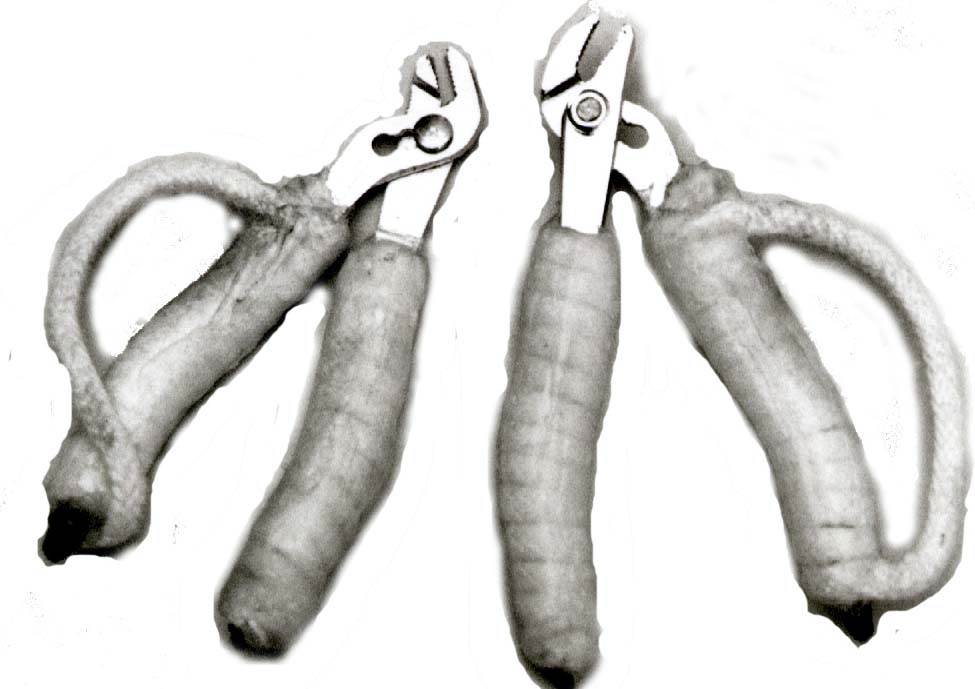
PLIERS: I prefer to use 5" offset slip joint pliers (AKA ignition pliers or channel locks). A good source for these are Mac Tools part no. p3. Sears also has a good pliers. You should pick pliers that fit your hand and have a nut and bolt for a pivot point (not a rivet). The pliers should not have slop when you wiggle the handles at right angles to their normal direction of use. They are usable new, but I would recommend that you modify them to speed your work and ease the stress on your hands. If you choose to modify your pliers, you will need a hot melt glue gun, a length of soft nylon clothesline, a small round file and a dish with some ice cubes.
WARNING! YOU MUST NOT TOUCH HOT MELT GLUE!
If you touch the hot glue with your fingers, you will be burned and you may pull hunks of flesh off trying to remove it. If you do have a hot melt accident, chill the melt immediately with an ice cube before attempting to remove it.
If you touch hot glue with an item (spoon, stick or other implement), the item will stick and make a mess. You may, however, touch hot melt with an ice cube! You may shape it, cool it, and, in general, accomplish many neat tasks. If you choose to work with the recommended type of pliers, you will hold both pliers with their curve in the up position. This will make the chain mail in progress easier to see and keep the bulk of the pliers out of the way (see illustration A on the next page).
Click for
a better view (48kb .)
The first step in customizing your pliers is to thicken the handle on the thumb side and add a thumb loop. Thickening gives better control and reduces pressure on the hand. The thumb loop allows use of the fingers without having to put down the pliers, and also allows you to open the pliers by simply opening your hand.
 Click for a better view
(53kb .)
Click for a better view
(53kb .)
First, lay a bead of hot melt on both sides (not top or bottom) of the thumb side. Then imbed the nylon line in a straight line up one side around the end and down the other side. Begin and end at the place in the handle where it becomes wide. Leave approximately one foot of rope on the end (see illustration B). After two or three minutes (cooling time), fill the top side with hot melt then coil the rope end around the handle all the way to the end. Make sure there is no hot melt showing, then grip the pliers. This will shape the pliers to the shape of your hand and imbed the rope in the melt. Take the remaining rope end, pass it over your thumb and attach it to the front of the pliers. Some looseness is necessary, but too much defeats the purpose. The other side of the pliers needs only a simple coil for now, but after you get a feel for knitting mail you may wish to add a "saddle" for your first finger. This "saddle" will keep your hands in exactly the same spot on the pliers and allow a stronger grip and more leverage.
Your pliers are now usable, but you may wish to add a small groove diagonally in the jaws for the ring to seat in. This is a tricky operation. If you file too large a hole, you won't be able to grip a ring, too small and it may nick the ring. Personally, I use a drill press and gently grip a turning drill bit the same diameter as the ring wire (typically 1/16"). If you try this,
USE HAND AND EYE PROTECTION
Bind any loose hair and don't wear loose clothing. Above all, be careful!
LAP TRAY: The lap tray is where you keep your loose rings and do your assembly. Cafeteria trays work well. It is best to work on a table sitting in a comfortable chair, but even so, the tray helps to keep your work contained and facilitates putting it away. IT IS VERY HELPFUL to cover the tray with a piece of velvet. It doesn't need to be good fabric, I usually buy old stuff from the thrift store. Cut a piece of velvet large enough to cover the entire top and wrap around to the back on all four sides. Duct tape one edge on the back and wrap it around the front to the opposite back side. Stretch it tight and duct tape it in place. Now stretch the other two sides and tape them in place. Avoid wrinkles and holes. The nap of the velvet will allow you to take an open ring in your pliers and pick up closed rings by poking the end of the open ring through them. Being able to pick up rings without having to use your fingers or set down your pliers will speed your knitting..
RINGS: Rings can be made by coiling wire around a dowel or on a crank handle and then cutting them using aviation snips or a jewelers saw. Alternatively, you may buy rings from ChainMaille Fashions using the enclosed order blank.
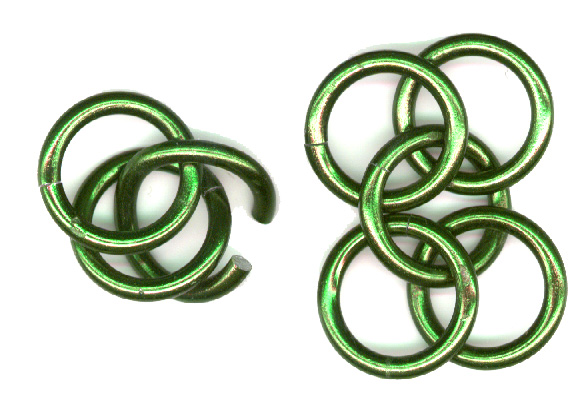
The first skill you must develop to become a quality knitter is proper ring closure. There are three dynamics that need to be executed simultaneously. The rings are made by coiling wire around a mandrel and then cutting them with a saw. This creates a ring that has a gap the thickness of the saw blade with the ends offset by the diameter of the wire (from the coiling). Grasp the ring in one of your pliers, positioning it so that the opening is on the top and the pliers is 90 degrees to the side. Grasp the other side in like fashion. Your pliers should be on opposite sides of the ring with the gap in the top middle (illustration A). Now you will close the ring by twisting it in the direction of its axis while simultaneously pushing the ends together to remove the gap. Care should be taken not to twist the ring relative to the cut wire faces. The wire that ChainMaille Fashions uses is a specially work-hardened jeweler's bronze which has substantial spring tension. To best close these rings, you will want to twist the ring a full wire diameter past the point where the wire ends match up while pushing the ends together the amount of the gap and that much more. If this operation is properly executed, you will hear two clicks as the cut wire faces slide back and forth across each other. The clicks tell you that the faces are parallel and that you have additional spring tension keeping the gap closed. It is possible (and even easy with practice) to close our cut rings such that you cannot feel the opening and can see it only with careful observation in good light. This is the kind of closure I demand of all of my apprentices. Try to relax your grip. A common problem with new knitters is a "death grip". It doesn't help to hold the ring so tightly that your knuckles turn white or the pliers dig half way though the ring.
CHAINMAILLEFASHIONS specializes in European style chain maille in the patterns known as 4 to 1 and 6 to 1 (each ring fully in the pattern going through 4 or 6 rings respectively).
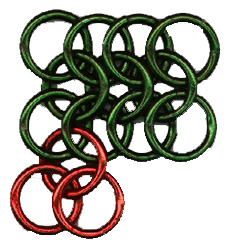
4 TO 1: To begin a piece of 4 to 1, start by taking one cut wire ring ( hereafter called an open ring) and picking up four solidly closed rings. Close the open ring as described above. Lay the five ring group on the lap tray and arrange them into three rows: two closed rings on top and bottom with an open ring in the middle (rows 1, 2, and 3). Note that the rings do not go through each other in right angles and that each row has a direction of lay. I recommend to right handers starting with the middle (open, row 2) row up to the right and adding rings to the right side. Rearrange your rows to follow this pattern (Illustration C). To lengthen your strip of maille, expand an open ring by twisting it away from you with your left hand pliers. Retaining your right hand grip, hook two closed rings and pick them up with the open ring (hereinafter called a triad). Attach this triad by inserting the open ring held in the pliers down through the rightmost ring on row 3 and up though the rightmost ring on row 1. This operation is best done by dragging the closed rings of the triad across the velvet for the last few centimeters and going down and up in a small scooping motion. Lift the entire piece up off of the tray and the work will all gather at the bottom of the open ring you are still holding with your right hand pliers. You should now have easy access to the top half of the working ring to effect your closure. Lay the strip back on the velvet, dragging it slightly to the left to spread the rings out and facilitate arranging the rows. Make sure that the loose rings added by the last triad are lying correctly--that is, that they have the same direction of lay as the matching rings in the previous triad. Add more triads in this manner until you have your desired length.
To start making the strip wider, add a triad with the open ring going up and up through the first two rings on row three. You now have rows 4 and 5 started. Continue rows 4 and 5 by taking one open ring and picking up one closed ring. Insert the open ring down through the last ring of row 5, up through the corresponding ring in row 3 and then up through the next ring in row 3. Note that rows formed by open(able) rings all lay in the same direction, closed ring rows all lay in the opposite direction, and open(able) ring rows don't go through other open(able) ring rows.

6 to1 pattern on the left and 4 to 1 pattern on the right
6 TO 1: This pattern is essentially the same, but you start by picking up 6 closed rings (row 1 = 3 rings, row 2 = 1 ring and row 3 = 3 rings). Add triads by inserting the open ring up through the rightmost TWO rings on row 3 and down through the rightmost two on row one. Start to widen by picking up three closed rings with one open ring and inserting up through the first three rings in row 3 (thereby starting rows 4 and 5). Lengthen rows 4 and 5 by picking up one closed ring with one open ring and inserting the open ring up through the last two rings on row 5 and down through the corresponding rings on row 3.
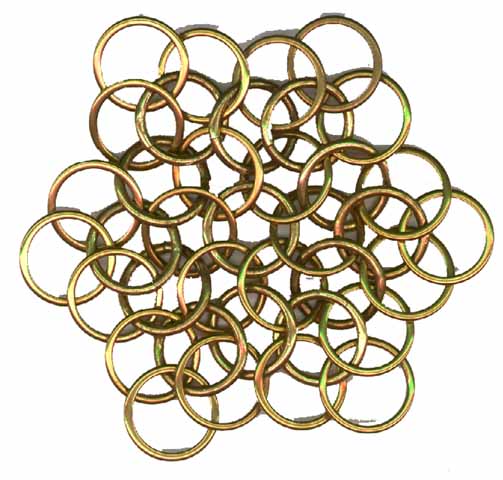
Coifs or chain hoods are traditional to nearly all eras and styles of European armor. While I have seen many different approaches to their design, there is only one I've found that combines grace, fit and style. I will attempt to explain how to create my preferred design. The only part that is different from what you have already learned is the expanding pattern that makes up the top of the head. It can best be visualized as six triangular pieces attached at their sides, but that's not the best way to make it. Instead, you will be doing something very much like knitting a strip of four-to-one maille, except that you will knit it around in a circle in such a way that the top row of closed rings becomes tighter, has fewer total rings, and has all rings linked into a single central ring.
Start by picking up six closed rings on an open ring. Think of the open ring in the center as a shared point of six expanding triangles. Attach a triad to any two adjacent closed rings by going up and up, ignoring the other rings for now. Arrange the five rings you've just handled to look like the three-wide pattern that you have been practicing. Now (step a) attach a triad by going down through the rightmost closed ring on the triad you've just attached and up though ONE ring (the rightmost) of the two you just went up and up through. Arrange the four rings on the outside circle so they all lay in the same direction that you have been working. As you make this pattern, you will be working in the same way as when you knit a single strip-that is, you will always be adding rings to your right. Since you are really making a circle, this means that you must turn the work as you add rings to ensure that the "growing end" is always facing to the right. Now (step b) attach one open ring with one closed by going down through the farthest right of the two loose rings, up through the same ring that you just connected the triad to (step a), and finally through the next of the closed rings along the center ring. You should now have five rings on the outside row with a "loose" ring in the middle. Think of the loose ring as a corner. Now repeat step a by attaching a triad to the right end (down through one ring on the out side closed row and up through one on the inside closed row). You've turned your second corner! Repeat step b. Continue in this way until you've gone full circle. Considering the first as a b, you will add a total of 5 a and b pairs. Notice that in both steps a and b you are really knitting four to one-each open ring is linking into four closed rings. The second to the last closure is the last step b that connects to the first ring connected to in the inside closed row. Closing the circle is a combination of the two steps. You will be adding a corner - the closed ring hanging off the last ring to be closed is not connected except to that closed ring. The last closure is difficult. The final closure is a variation of step a in that your initial triad was a step b with an extra ring being stored for the final step a. In other words, pick up one closed with one open and knit down through the last added loose ring, up through the inside closed ring and down through the loose ring that was added in the initial starting step. You can check the correctness easily; you should have six sides with each side having four rings (double counting corner rings) (Illustration E). Furthermore, all the rings except the outermost row will go through four other rings ( including the six corners, one on the inside and three on the outside).
 click here for detailed coif instructions
When you've done this, the rest is easy. Continue adding concentric circles by normal knitting until you come to the end of a "row" (lower edge of the triangle). Then extend it with a triad, performing both steps a and b. Corner rings from the previous row should now go through one ring on the inside row and three on the outside row. After your second pass around the outside row will have six sides with six rings each. The last closure of each row is the same one used in the first row. The next row will have eight rings in each side, etc. To determine where to stop adding rings, knit a strip of maille five rings wide and long enough to go around your head (include any padding you intend to wear). Count how many rings it takes. Add two for comfort. When you count the rings on the expanding sides, remember that the corners are shared. When you've built your center piece, attach your measuring strip and put it on your head. Typically, it take three or four pairs of rows past the point where you stop expanding to have maille down to the eyebrows. Leave an opening for your face that closes under the chin and continue knitting until it reaches your shoulders. Mark four spots (I usually use the front, back, and both shoulders, but that is just my preference). Call these points corners and use the expanding pattern you've just learned to build the mantle part of the coif. Make it as large as you are comfortable with and it will be done.
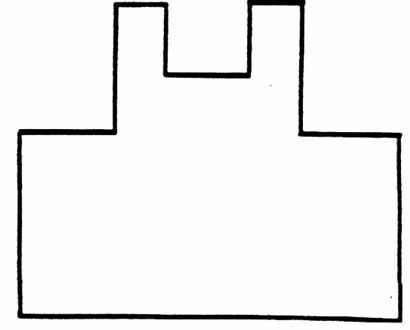
Hauberks (shirts and vests) are more time consuming because of the number of rings involved, but are in fact much less confusing. I break them into three parts for the planning stage. First is the barrel. Measure around your chest and stomach (include hips if you are making a piece that long). Choose the largest of these measurements and build a rectangular piece that long and as wide as you want it hang. Next add a rectangle to cover from the back of the neck to the barrel. Center it for a front closure. FIRST TRICK OF THE TRADE: Add a single row of open rings to the back of the neck. This will correct the direction of lay so that when you build part three, the shoulder straps, they will attach easily to the front. Now build two shoulder straps that are approximately one third as wide as your neck triangle and long enough to reach over the shoulders and attach to the front. Exactly where they will attach in front will vary according to chest and stomach size. It should look something like Illustration F. Most knitters would be done at this point, but my experience with tailored halters suggested a simple refinement. By adding a row of smaller rings to the back shoulder edges, you get a better, more comfortable fit (from armpit to top of the shoulder).